It’s been over a year since I started with the homelab project. To be honest, in the beginning I overcomplicated everything: I installed Proxmox with several containers, a virtual router, services I didn’t need, and an endless number of rabbit holes that, while not particularly useful in the end, helped me learn and eventually simplify things quite a bit.
If Google or some AI brought you here, you probably already know what a DNS server is and what Pi-Hole is, but just in case, here’s a quick intro.
What Is a DNS Server and What Is Pi-Hole?
A DNS (Domain Name System) server translates domain names (like google.com) into IP addresses that computers understand (like 142.250.185.14). It’s like the phone book of the internet.
Some examples of DNS servers:
- Your ISP’s (they come by default in your router)
- Google DNS (8.8.8.8)
- Cloudflare (1.1.1.1)
- Quad9 (9.9.9.9)
Pi-Hole sits in the middle of this communication, intercepting all DNS requests made by devices on your local network, and blocking those that are on blacklists (trackers, ads, malware, etc.).
My Homelab and My Specific Use Case
My homelab is simple:
- A main computer running Arch Linux (homelab host)
- A MacBook Air
- The ISP’s router (unmodified)
- Other connected devices: my partner’s laptop, phones, TV, Google Home Mini…
What Do I Want to Achieve?
I want a Docker container running Pi-Hole to act as a DNS server for my entire local network.
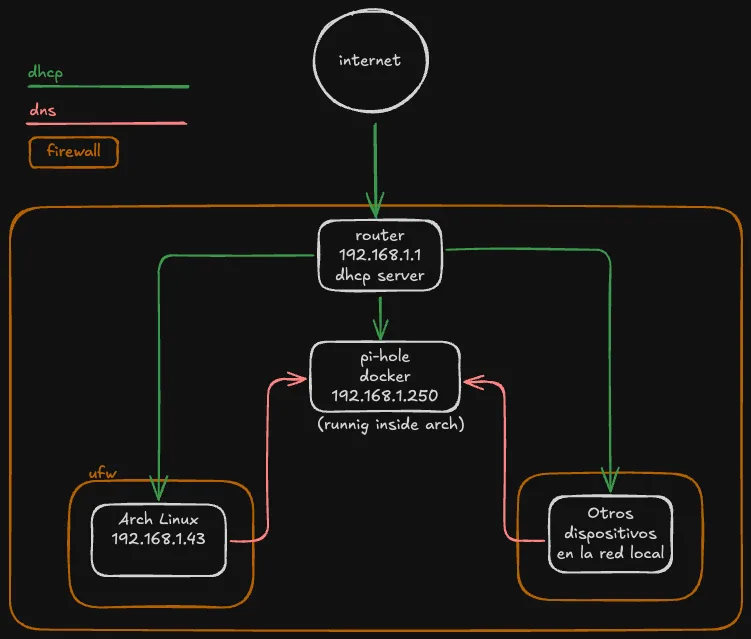
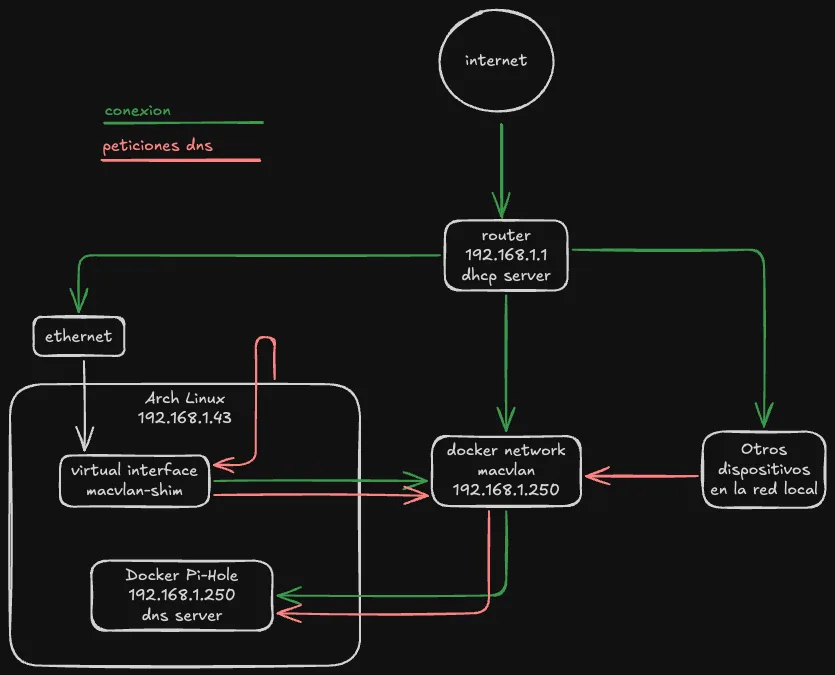
To avoid routing DNS traffic from my host to the container, I use a macvlan network. This gives Pi-Hole its own IP within the local network, as if it were just another device.
Why Use Pi-Hole and Change Your DNS?
Privacy
Without realizing it, all your DNS queries usually go directly to your internet provider (ISP), because that’s how the router comes configured by default. That data is then sold to create profiles and target you with advertising.
With Pi-Hole:
- You reduce tracking.
- You gain privacy.
- You filter malicious content before it reaches your devices.
Security
A compromised DNS server can redirect your requests to malicious sites without you noticing. Pi-Hole acts as an additional layer of defense.
Performance
Pi-Hole maintains a request cache, so many responses are resolved faster without needing to leave your network.
macvlan Network in Docker
This type of network only works on Linux. On Windows or macOS it’s not directly supported. If you’re not using Linux, I provide an alternative further below.
A macvlan network allows the container to have its own IP within the local network. The upside: each container behaves as if it were another device on the network. The downside: you need a small workaround for the host and the container to communicate with each other.
Why Can’t the Container Communicate with the Host?
By design of the Linux kernel, the host’s interface and the container’s interface on a macvlan network are isolated. They cannot communicate with each other directly.
More information about Docker macvlan networking in the official documentation: https://docs.docker.com/engine/network/drivers/macvlan/
To solve this, further below I create a virtual interface (macvlan-shim) that acts as a bridge.
Installation
I’ll assume you have Docker installed and know the basics. Let’s get straight to the point.
Create macvlan network
docker network create -d macvlan \
  --subnet=192.168.1.0/24 \ # network subnet
  --gateway=192.168.1.1 \ # router IP
  -o parent=enp7s0 \ # the interface through which you receive internet, in my case ethernet
  --ip-range=192.168.1.240/28 \  # network range
  pihole_macvlan # network name
Create persistent directories
mkdir -p ~/docker/pihole/etc-pihole
mkdir -p ~/docker/pihole/etc-dnsmasq.d
Create docker-compose.yml
services:
  pihole:
    image: pihole/pihole:latest
    container_name: pihole
    hostname: pihole
    restart: unless-stopped
    networks:
      pihole_net:
        ipv4_address: 192.168.1.250 # manual IP assignment for the container
    volumes: # volume mounts for persistence
      - ./etc-pihole:/etc/pihole
      - ./etc-dnsmasq.d:/etc/dnsmasq.d
    environment:
      TZ: Europe/Madrid
      WEBPASSWORD: "changeme123"
      DNSMASQ_LISTENING: all
      DNS1: 9.9.9.9 # don't worry too much about this, it can be changed later
      DNS2: 149.112.112.112
    cap_add:
      - NET_ADMIN

networks:
  pihole_net:
    external: true
    name: pihole_macvlan # network we previously created
Then, start the container:
# Make sure you're in the ~/docker/pihole directory
# if you run ls, you should see two folders (etc-pihole and etc-dnsmasq.d) and the docker-compose.yml
docker-compose up -d
Access from the host
You won’t be able to reach 192.168.1.250 from the same host. To solve this:
sudo ip link add macvlan-shim link enp7s0 type macvlan mode bridge
sudo ip addr add 192.168.1.251/32 dev macvlan-shim
sudo ip link set macvlan-shim up
sudo ip route add 192.168.1.250 dev macvlan-shim
If you want to know what this does step by step, copy and ask ChatGPT or Claude — they’ll explain it better than I can. But basically what it does is that when your host is looking for IP 192.168.1.250, it routes it to macvlan-shim, which is where our Docker container with Pi-Hole is connected.
Now everything should work fine and you’ll be able to access http:///192.168.1.250/admin from the host.
Option Without macvlan (Bridge Mode)
If you’re using Windows or Mac, or don’t want the extra complexity:
If you want to know what this does step by step, copy and ask ChatGPT or Claude — they'll explain it better than I can. But basically what it does is that when your host is looking for IP 192.168.1.250, it routes it to macvlan-shim, which is where our Docker container with Pi-Hole is connected.

Now everything should work fine and you'll be able to access http:///192.168.1.250/admin from the host.

services:
  pihole:
    container_name: pihole
    image: pihole/pihole:latest
    restart: unless-stopped
    environment:
      TZ: "Europe/Madrid"
      WEBPASSWORD: "changeme123"
      DNS1: 1.1.1.1
      DNS2: 1.0.0.1
    volumes: # volume mounts for persistence
      - ./etc-pihole:/etc/pihole
      - ./etc-dnsmasq.d:/etc/dnsmasq.d
    ports:
      - "53:53/tcp"        # DNS TCP
      - "53:53/udp"        # DNS UDP
      - "80:80"            # Web panel
    cap_add:
      - NET_ADMIN
Remember to open the ports in the firewall if necessary.
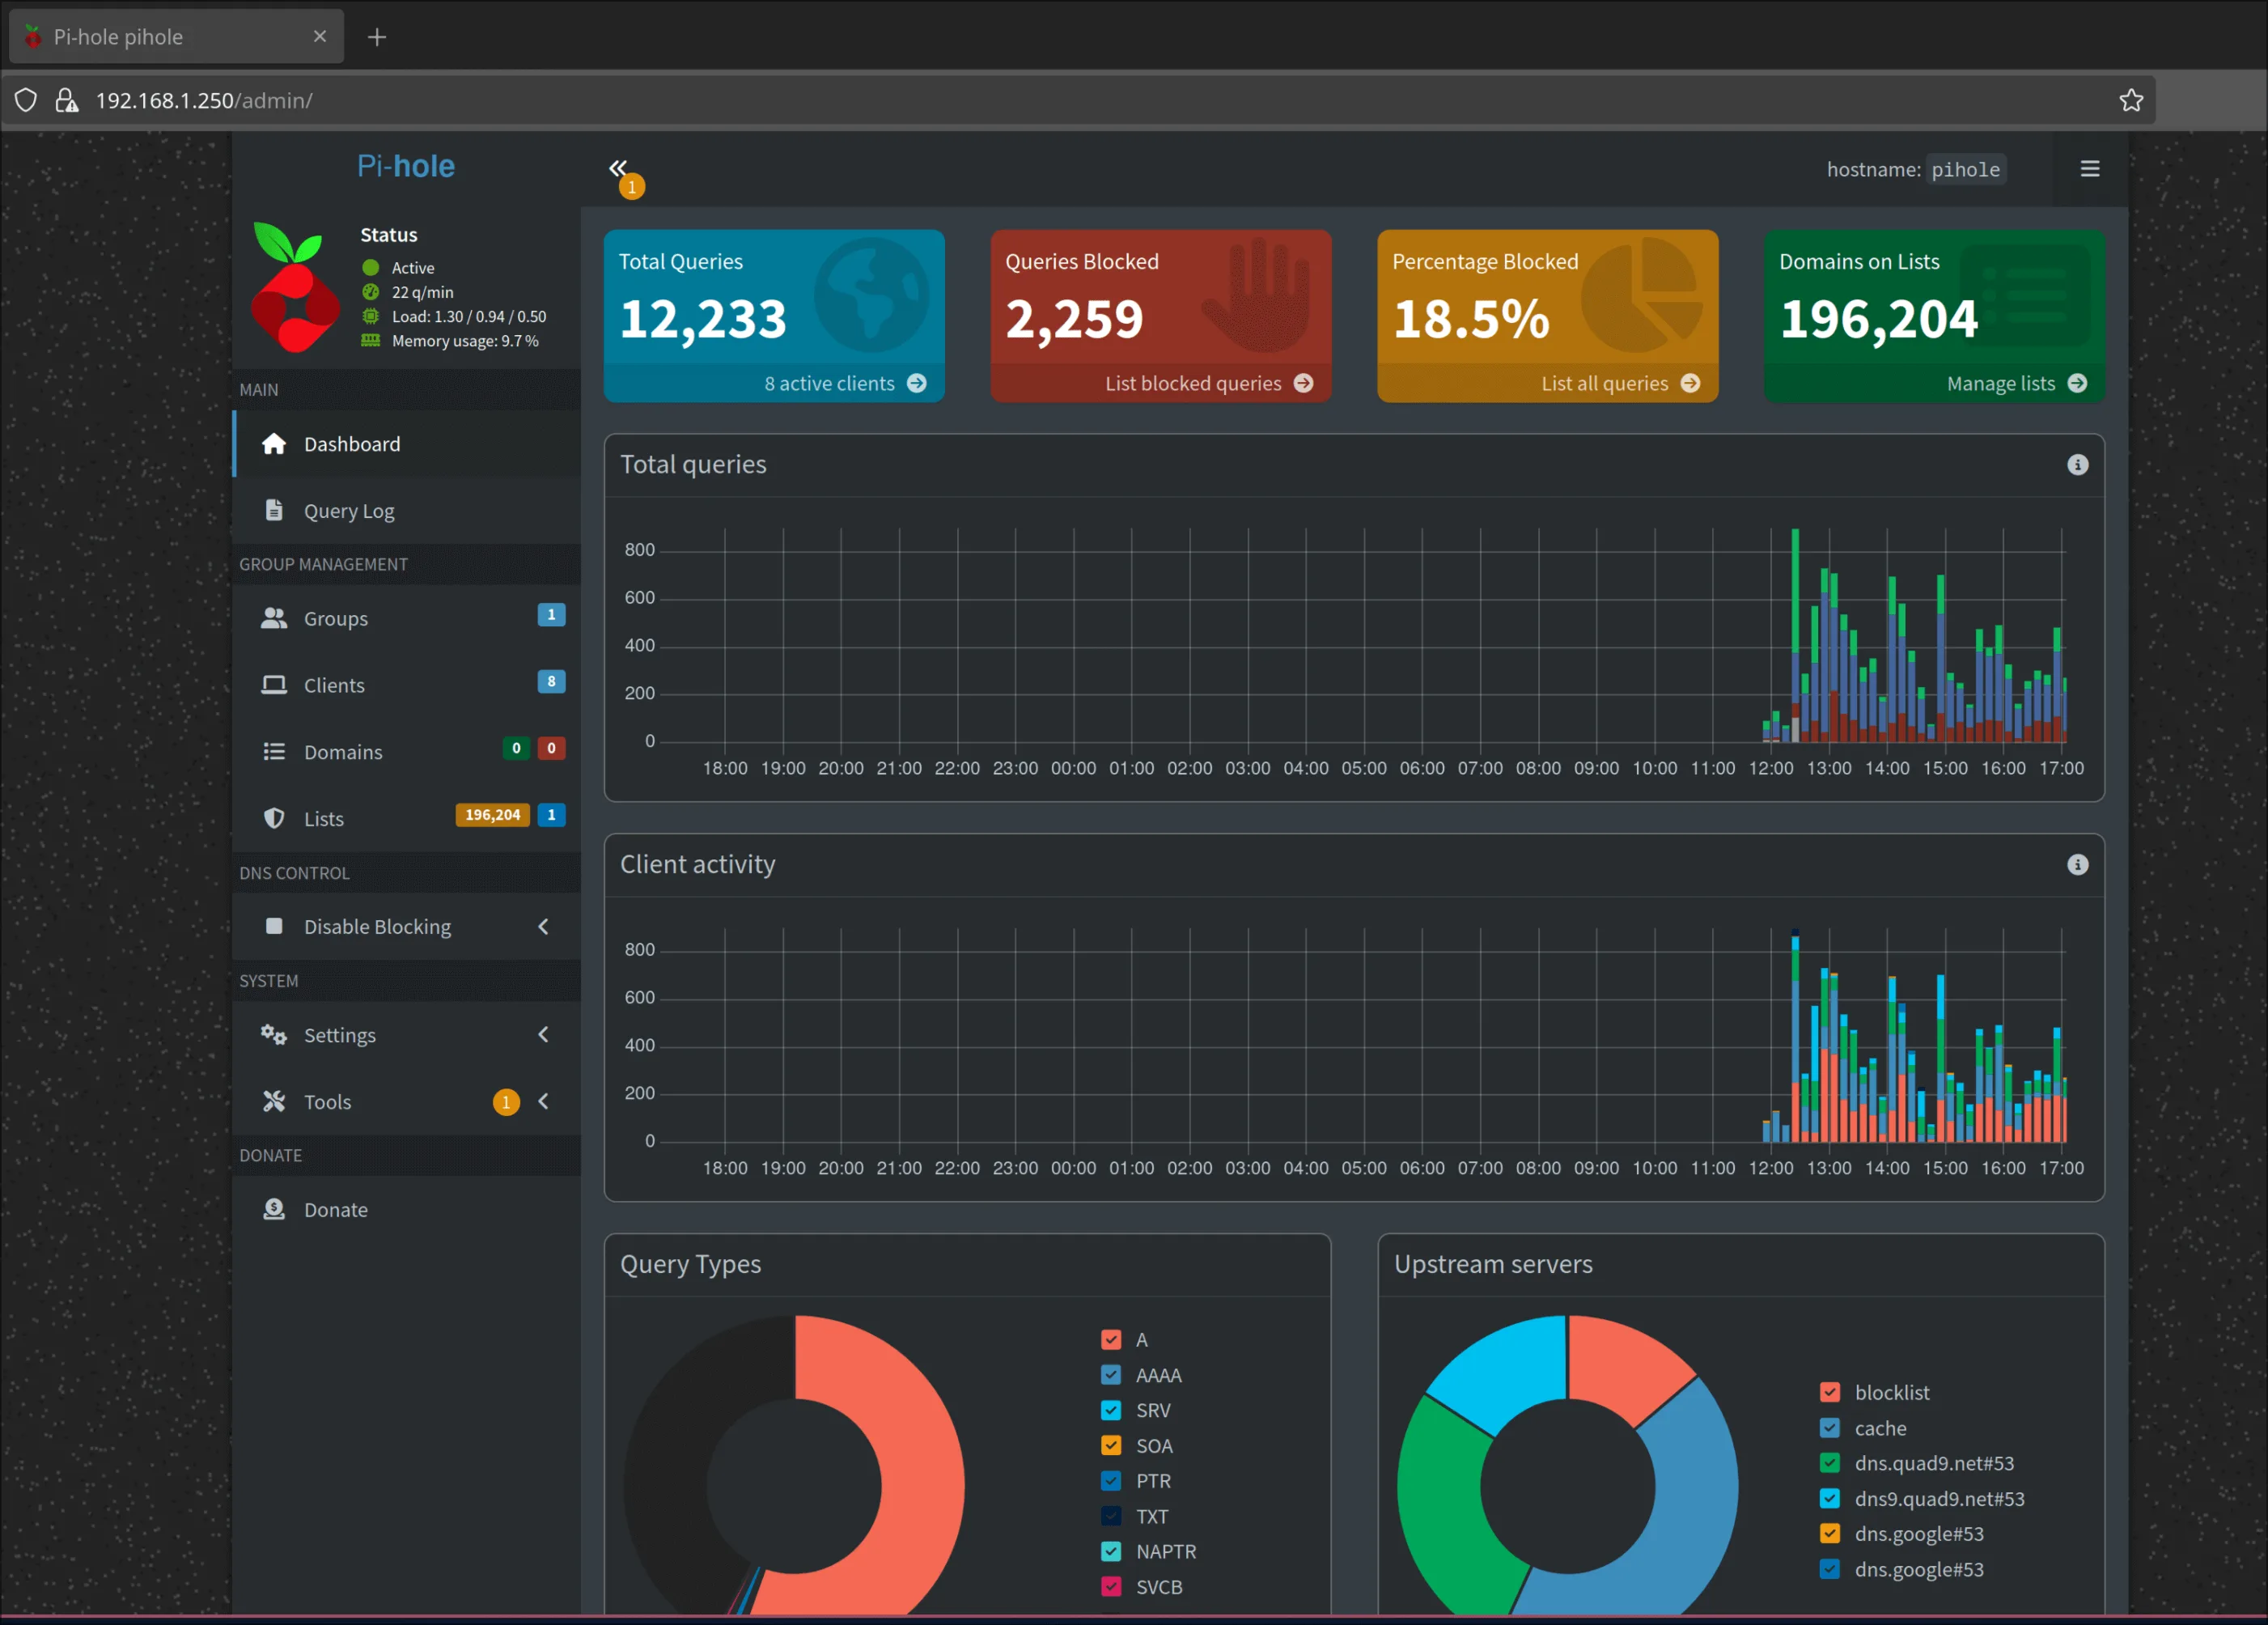
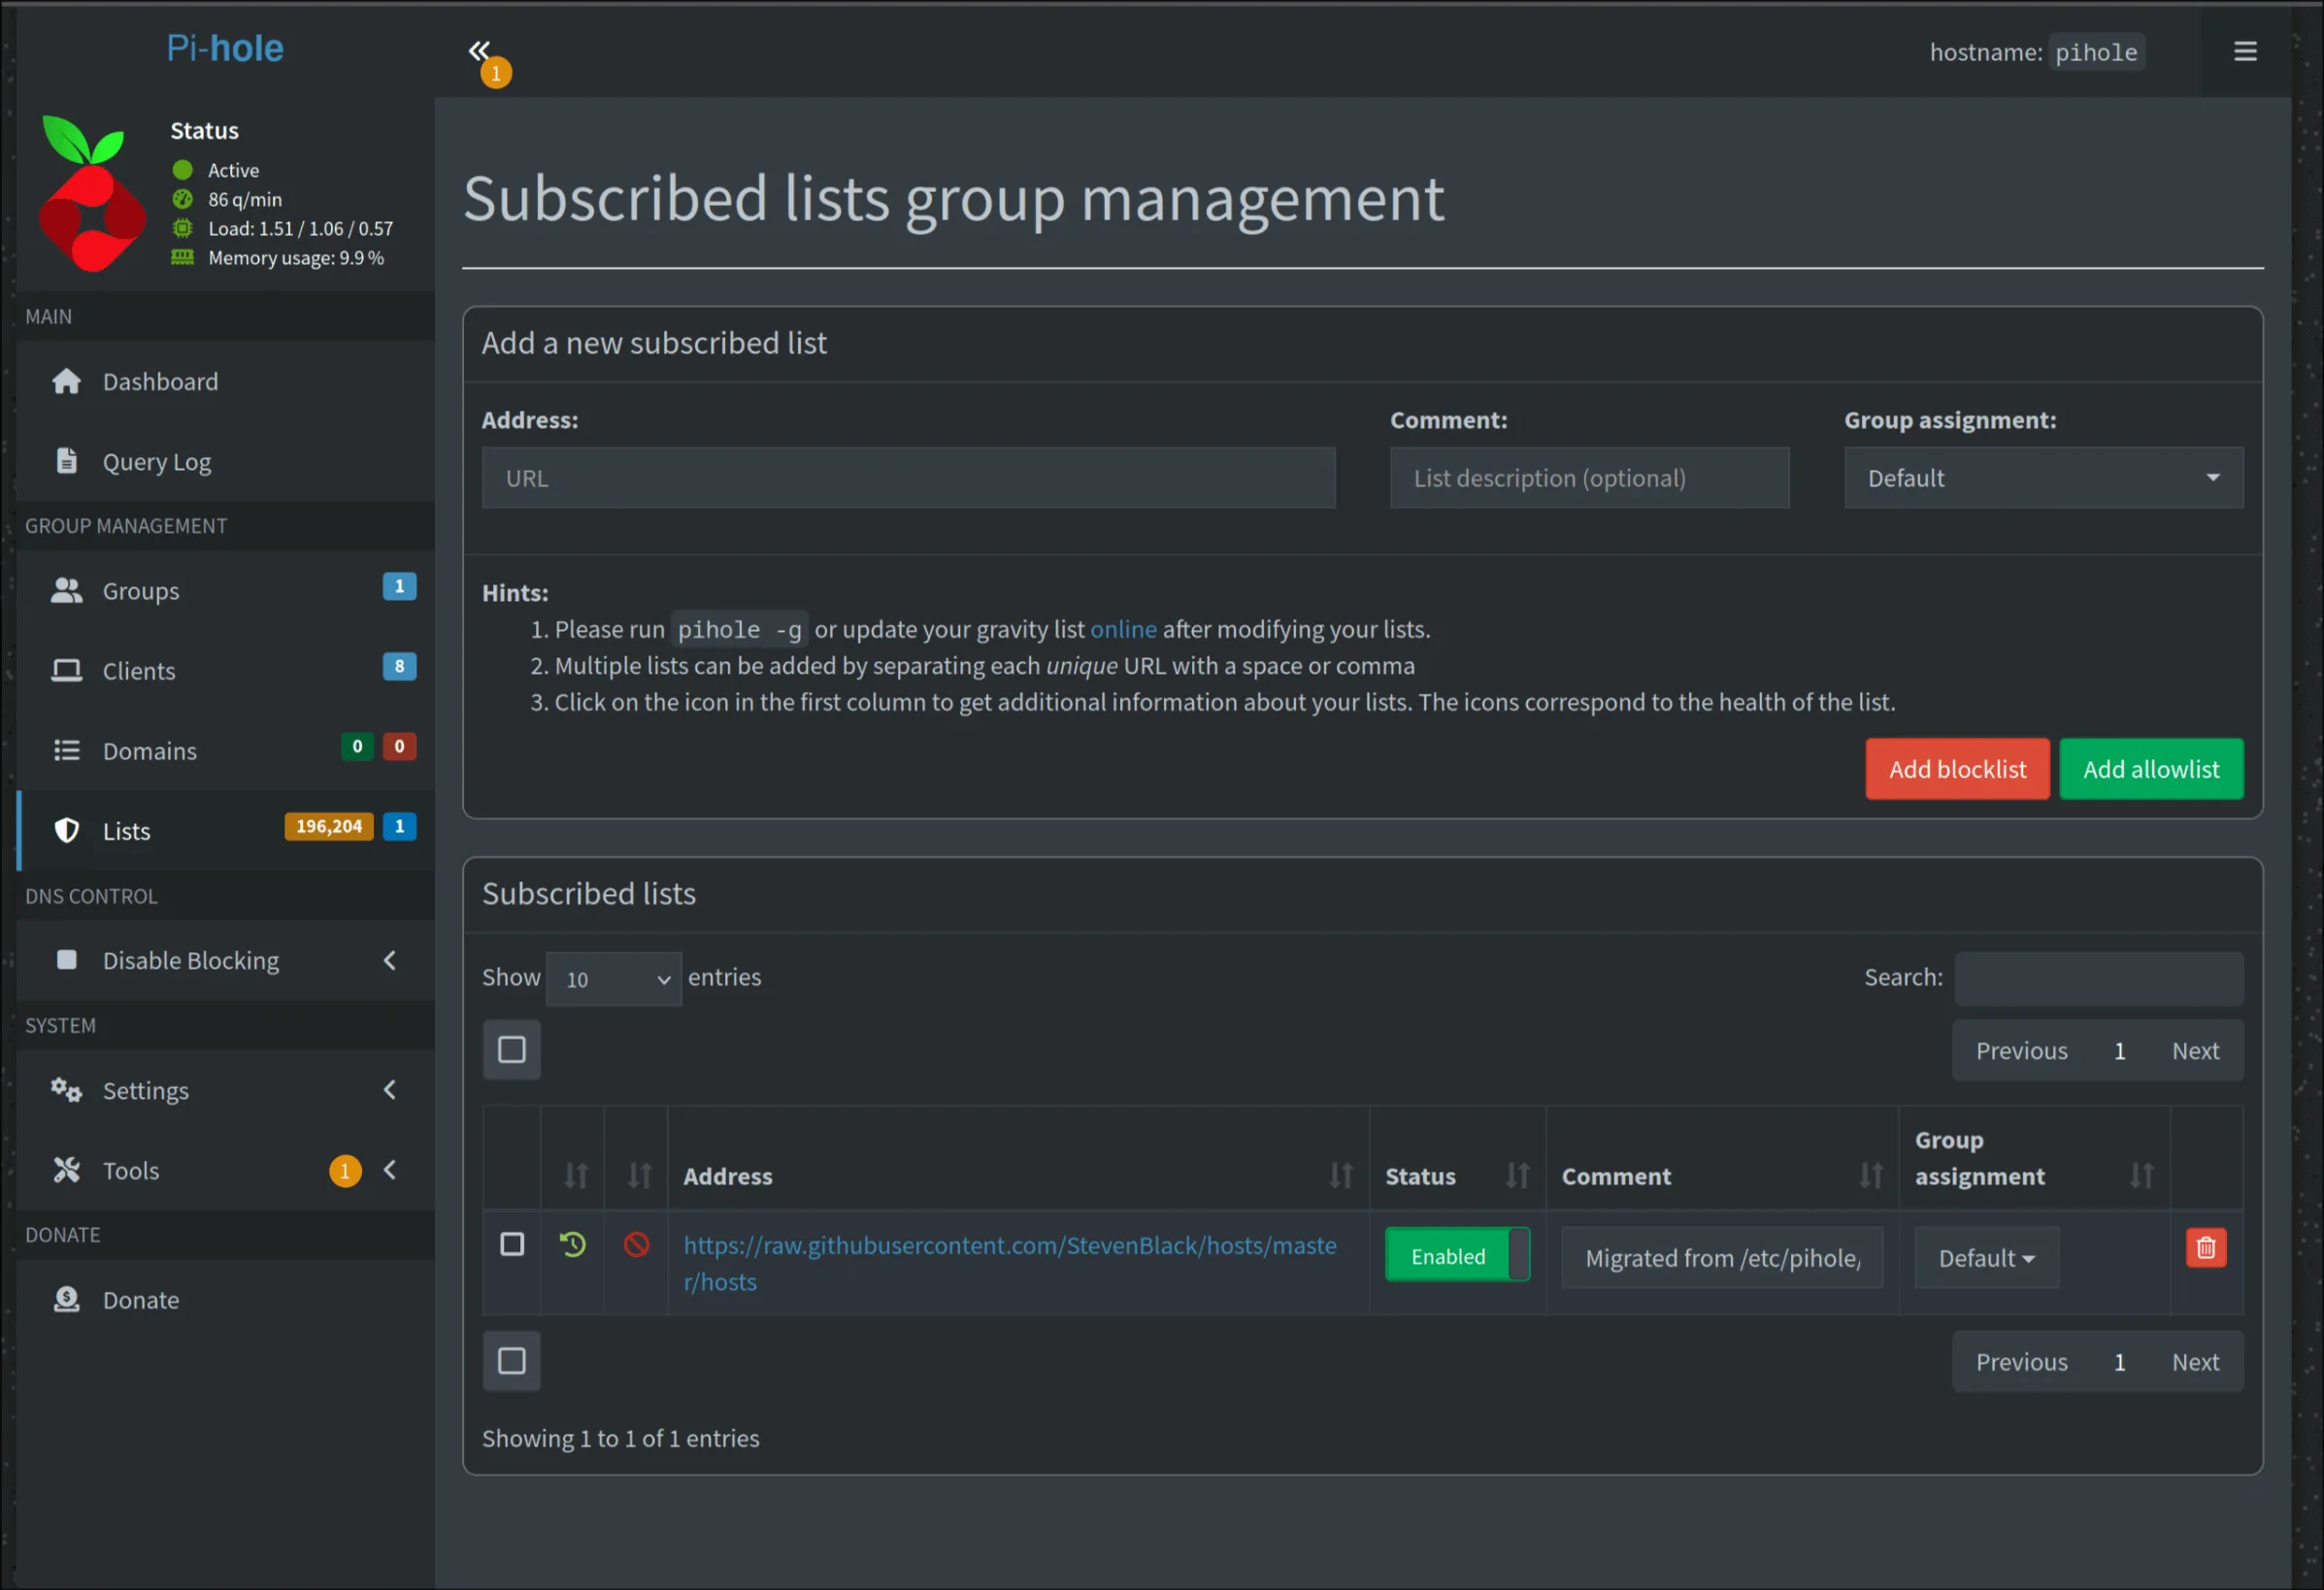
Basic Pi-Hole Configuration
Right after installation, access http://192.168.1.250/admin. Use the command pihole setpassword from inside the container to change the password.
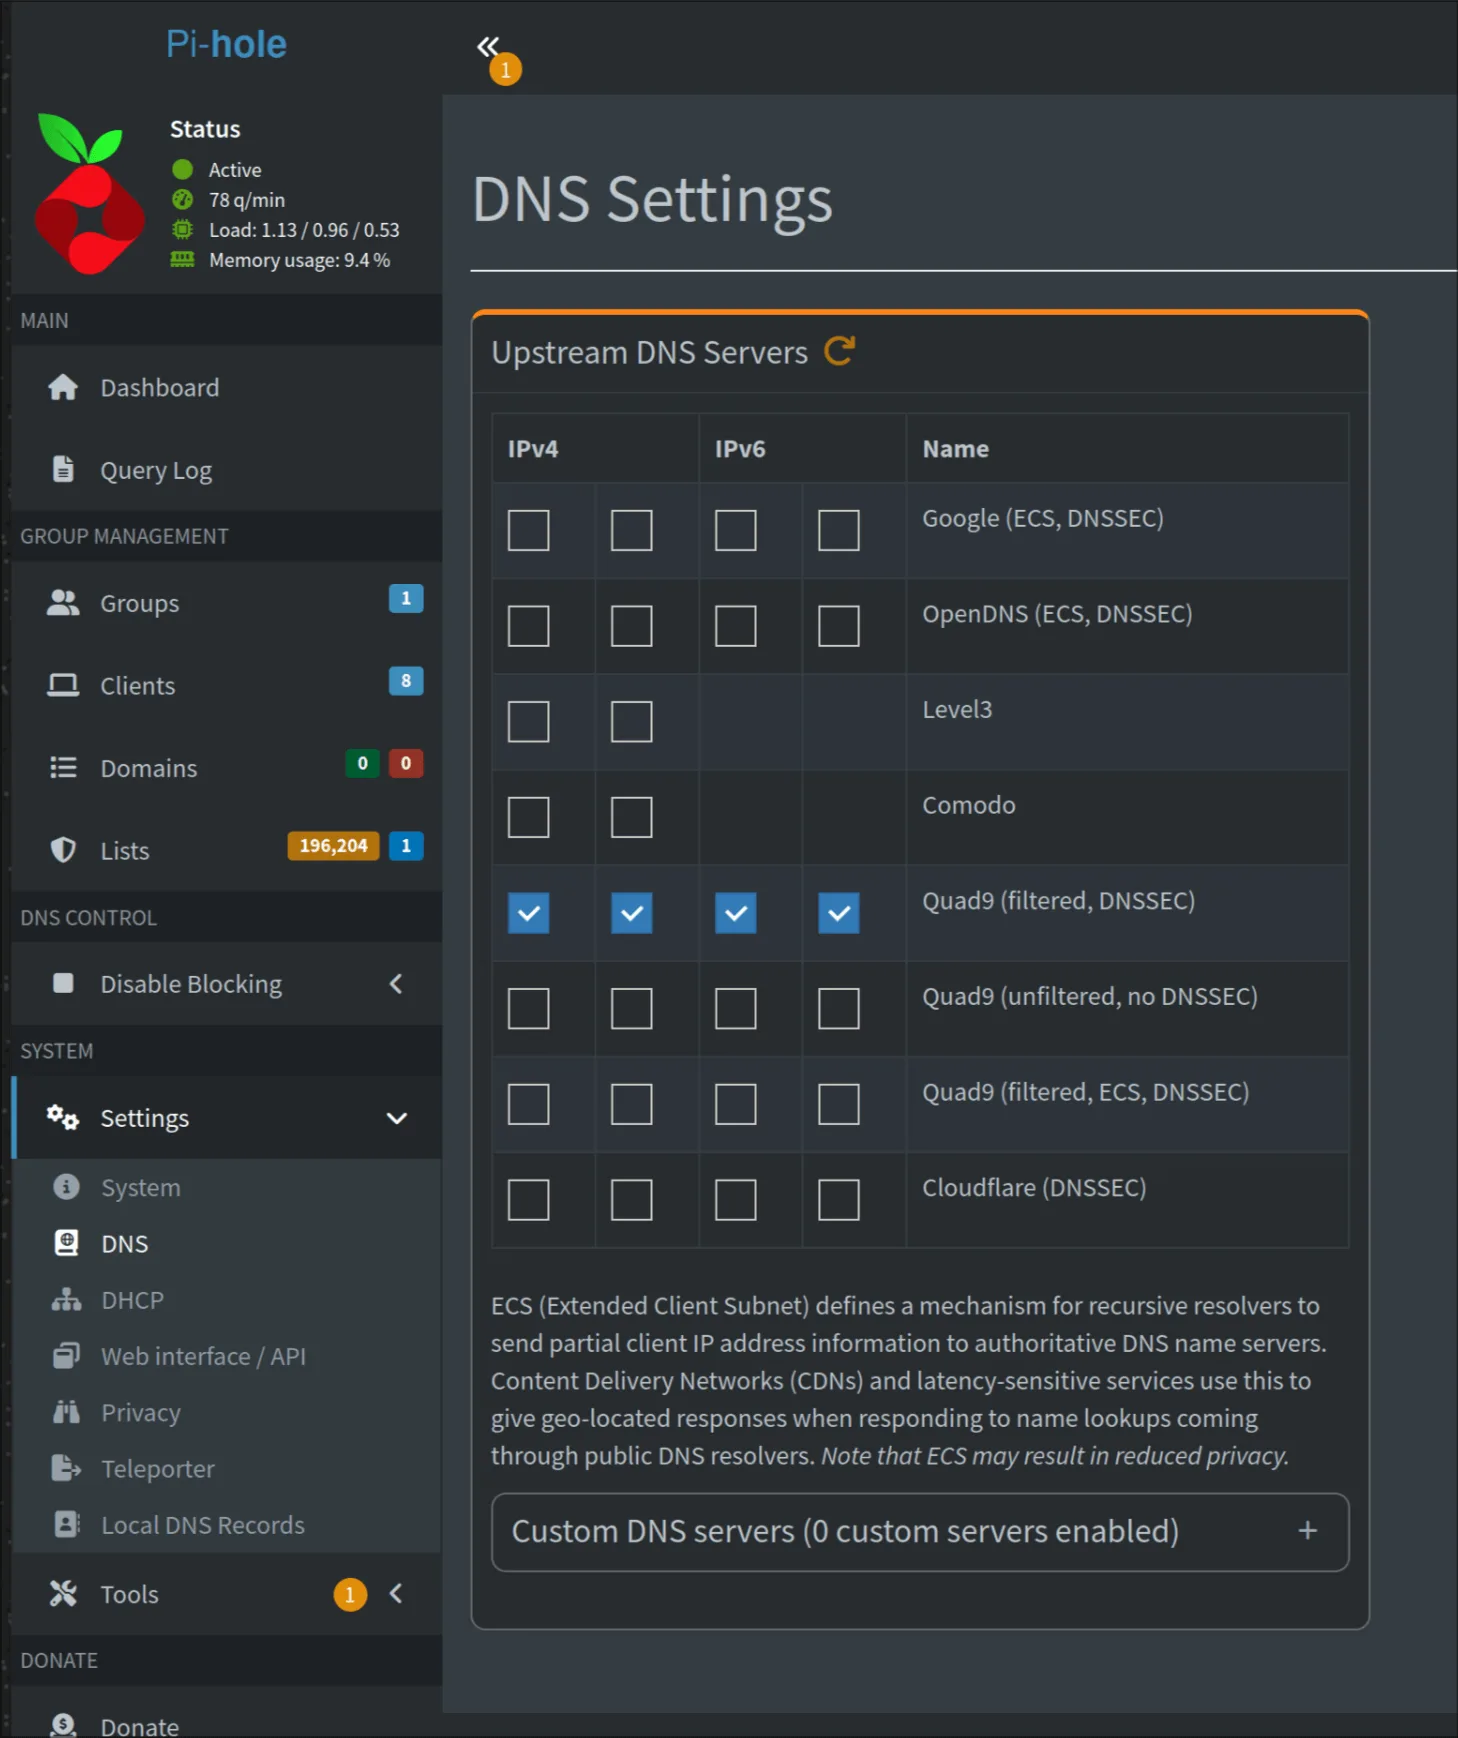
I recommend reviewing:
- Settings > DNS to select your preferred DNS providers
- Group Management > Adlists to manage block lists
Which DNS I Use
I use Quad9 (9.9.9.9 and 149.112.112.112). I don’t have a specific technical reason beyond the fact that they inspire more trust and their privacy policy is quite clear.
Block Lists
The default ones already block quite a lot, but you can add more from Blocklist Project . There are thematic lists for trackers, ads, malware, gambling, etc.
Configuring DNS on the Router and Devices
Router
Go to 192.168.1.1, find the DNS settings, and set:
- DNS 1: 192.168.1.250
- DNS 2: 9.9.9.9 (fallback)
Restart the router after saving.
Devices
They usually pick up DNS via DHCP (automatic mode). If you’ve configured them manually, change them to:
- DNS 1: 192.168.1.250
- DNS 2: 9.9.9.9
Additional Considerations
Browsers and DNS over HTTPS (DoH)
Chrome and Firefox sometimes force the use of DoH (DNS over HTTPS), which means DNS requests bypass Pi-Hole. In Chrome, you can disable this from:
chrome://settings/security > Use secure DNS
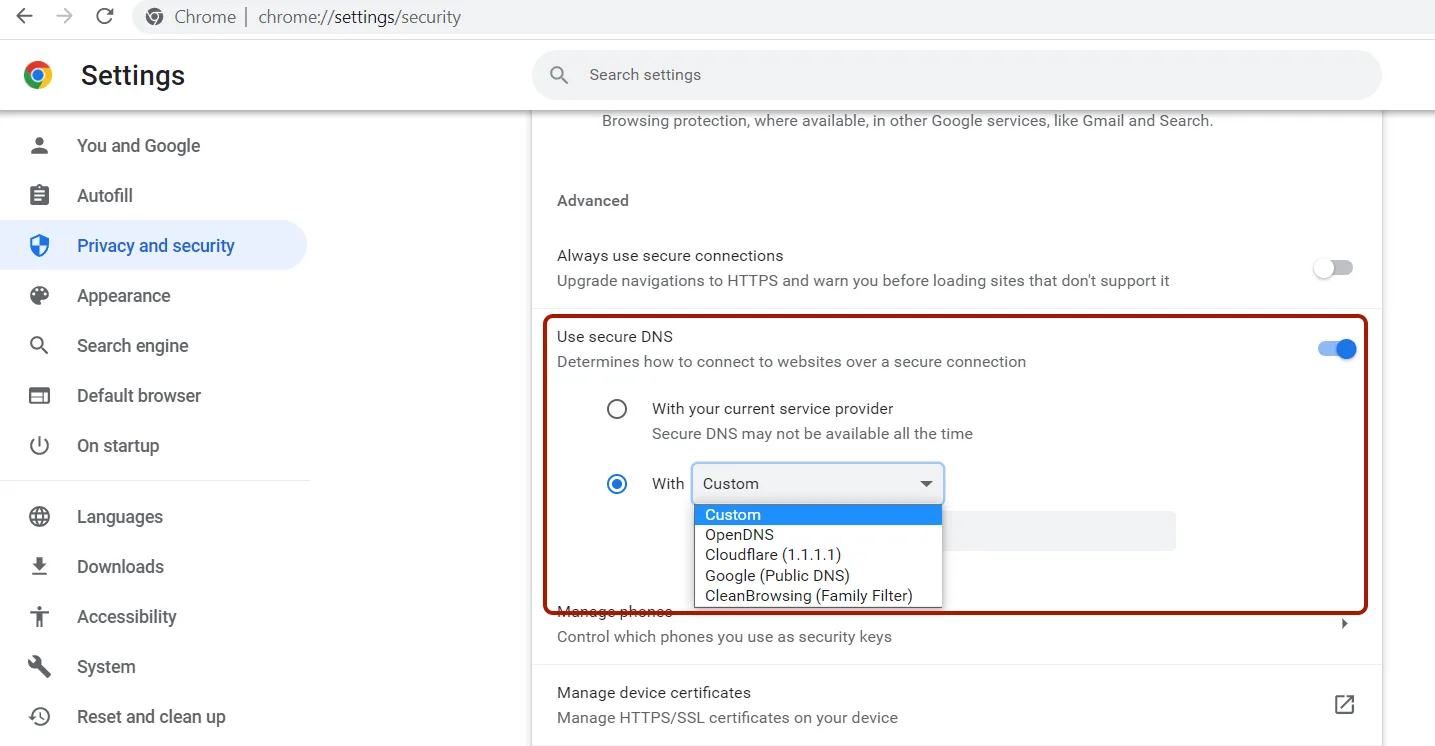
Disable it or use the “With your current service provider” option.
iCloud Private Relay
If you have Apple devices, disable iCloud Private Relay. This service redirects DNS traffic through its own servers, and by default in Pi-Hole’s built-in block list, traffic to these iCloud services is blocked — these domains are: mask.icloud.com or similar.
Both with Chrome/Cloudflare and Safari/Apple with iCloud, you have two options: either send your DNS traffic through them, in which case Pi-Hole will only see requests to those domains rather than the domains you actually visit, and you delegate your privacy and security to them; or you disable them and use Pi-Hole.
Apple’s official documentation on how iCloud Private Relay works
Conclusion
This setup might seem a bit confusing at first, but once configured, having Pi-Hole on your network is one of those small improvements you notice every day. Fewer ads, more privacy, and full control over DNS traffic on your network.
If you’ve made it this far and set everything up successfully: congratulations. Send me an email if you have questions or want to discuss anything.