In another article I cover the process of signing up with Hetzner and the server creation and basic hardening.
In this article I want to show how to set up a VPN connection with WireGuard. Specifically on a Hetzner server. I want to go a step further with the VPN configuration and create two setups:
- A basic profile to have a private connection to the server through the VPN. This way I can enable SSH only via VPN and not expose it publicly.
- A second profile that not only connects to the server, but routes all traffic and uses the server as an exit point, like a commercial VPN, so you can browse while hiding your IP and showing the server’s IP instead.
Initial Idea
- Server on Hetzner, in this case running Debian 12.
- Client: You can use whichever you prefer, since the result is a configuration file. In this case I’ll show you how to connect from a MacBook.
In my case, I’ve used it to connect to the cloud server, but you could use it to connect to your homelab server and access services on your network, like Jellyfin, Seafile, etc. Or to make your exit IP your home IP, to avoid issues with Netflix/Disney and similar services, or even to work remotely while appearing to be connected from home.
Worth mentioning that in practice, I use Tailscale to connect to my homelab services, but I’ll talk about Tailscale in another article.
Before We Start
What is WireGuard and why use it?
WireGuard is a modern, fast, and lightweight VPN. Unlike traditional options like OpenVPN or IPSec, WireGuard is based on a minimalist design: less code, less complexity, less room for error. It uses state-of-the-art cryptography (such as Curve25519 and ChaCha20) and is designed to be easy to configure, audit, and maintain.
I recommend these two quick and simple videos about WireGuard:
- (AllThingsSecured) - What is Wireguard? A “New” VPN Protocol + How it Compares to OpenVPN
- (vpnMentor) - WireGuard Explained: The Fastest, Most Secure VPN Protocol
Conceptual Step-by-Step Overview
- Access the server via SSH and install WireGuard
- Generate WireGuard keys on the server
- Profile configuration
- Enable packet forwarding
- Firewall configuration
- Start the WireGuard service
- Generate client profiles
- Client configuration
- Client connection and testing
Step by Step
Initial Server Access and WireGuard Installation
We SSH into the server, either with a password or using keys, update the system, and install WireGuard.
ssh root@SERVER_IP

# once inside the machine

apt update && apt upgrade -y

apt install wireguard -y
`
WireGuard Key Generation
WireGuard uses a key pair (private and public) to identify each node.
umask 077
wg genkey | tee /etc/wireguard/privatekey | wg pubkey > /etc/wireguard/publickey
This:
- Applies secure permissions (so no one else can read the keys)
- Creates two files:
- /etc/wireguard/privatekey
- /etc/wireguard/publickey
With these keys we’re going to generate the WireGuard configuration file.
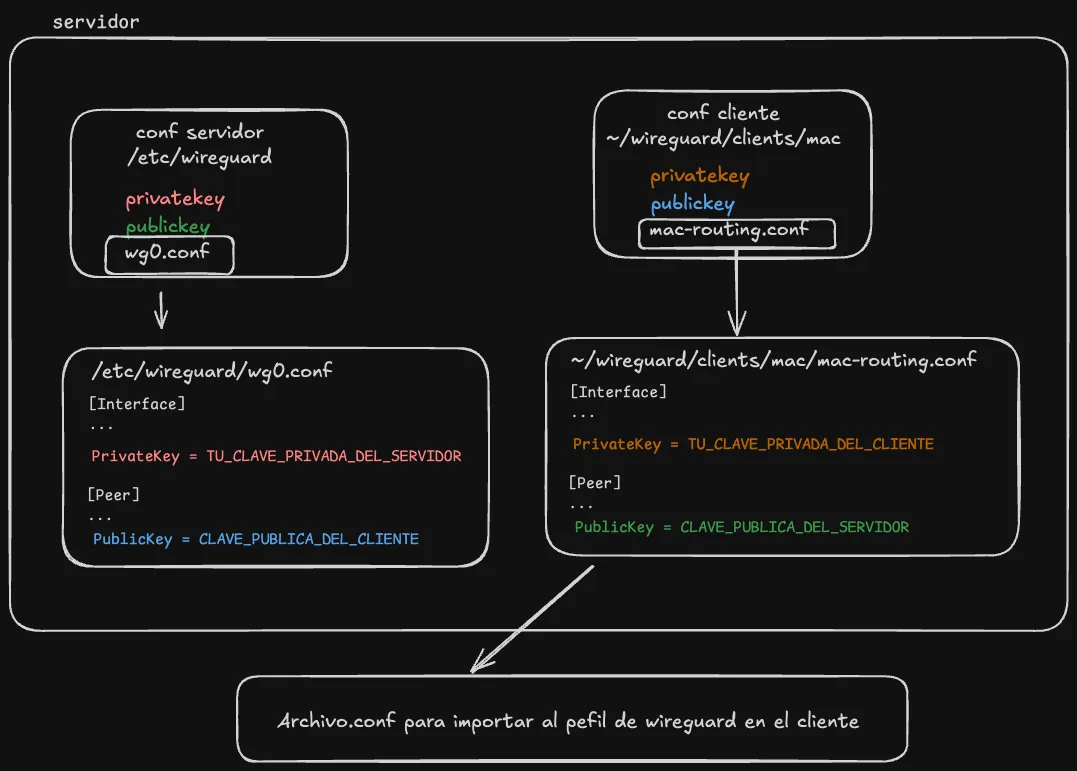
Creating wg0.conf
We create the wg0.conf file, for example at /etc/wireguard/wg0.conf
[Interface]
PrivateKey = YOUR_PRIVATE_KEY
Address = 10.8.0.1/24
ListenPort = 51820
SaveConfig = true

# Optional (we enable IP forwarding, important for traffic redirection)
PostUp = sysctl -w net.ipv4.ip_forward=1; iptables -t nat -A POSTROUTING -s 10.8.0.0/24 -o eth0 -j MASQUERADE; ufw route allow in on wg0 out on eth0
PostDown = sysctl -w net.ipv4.ip_forward=0; iptables -t nat -D POSTROUTING -s 10.8.0.0/24 -o eth0 -j MASQUERADE; ufw route delete allow in on wg0 out on eth0
In PrivateKey, we put the contents of /etc/wireguard/privatekey
Address — this will be the network we’re going to create, and the machine’s VPN IP will be 10.8.0.1
By default port 51820 is commonly used, but you can use whichever you want. It’s important to know that WireGuard uses UDP, so if you need to configure the firewall, make note of the port you’re using.
- PrivateKey: the server’s key
- Address: the server’s internal IP on the VPN network
- ListenPort: UDP port (you can change it if you use a different one)
- SaveConfig: saves changes if you make modifications with wg
- PostUp/PostDown: enables and disables IP forwarding automatically
- The rule ufw route allow in on wg0 out on eth0 is necessary if you’re using UFW, as in my case.
Open Firewall Ports (UFW in My Case)
It’s important to understand how traffic is routed and filtered on your network, or on the specific server. For example, Hetzner has a firewall you can configure from the central dashboard and apply to the server; then, inside the server you can configure, as in my case, a firewall.
If you have a firewall enabled, you probably know how to allow incoming traffic on a port. In my case:
ufw allow 51820/udp
Enable IP Forwarding
This is necessary if we want to route traffic and “mask our IP” to browse with the server’s IP.
We edit sysctl.conf:
nano /etc/sysctl.conf
We find or add the following declaration:
net.ipv4.ip_forward=1
We apply the change without restarting with:
sysctl -p
# you should see "net.ipv4.ip_forward = 1"
Activate the wg0 Interface
With this step, we bring up the interface and start the VPN server.
wg-quick up wg0

# you should see something like this:
# [#] ip link add wg0 type wireguard
# [#] wg setconf wg0 /dev/fd/63
# [#] ip address add 10.8.0.1/24 dev wg0
# [#] ip link set up dev wg0
To verify it’s working you can use the command: wg and you’ll see the active configuration for wg0, including your public key and port.
Create Client Keys
On the server, we run the following. I’ve named it mac, but you can name it whatever you want. Keep in mind that what you’re creating now is a .conf file that you’ll need to use on the client. You can use the same one to connect from your Mac or from your phone, but not simultaneously — if you need multiple devices connected at the same time, you should create a profile for each client.
mkdir -p ~/wireguard/clients/mac
cd ~/wireguard/clients/mac

wg genkey | tee privatekey | wg pubkey > publickey
This generates two files:
- privatekey → the client’s private key (Mac)
- publickey → the client’s public key (to be added to the server)
Create the .conf File to Import in the WireGuard App
Here we’re going to create two profiles: one to route all traffic (mac-routing.conf) and another to just connect to the machine (mac.conf)
mac-routing.conf
# we're in ~/wireguard/clients/mac
nano mac-routing.conf

# add the following:
[Interface]
PrivateKey = YOUR_CLIENT_PRIVATE_KEY
Address = 10.8.0.2/32
DNS = 9.9.9.9

[Peer]
PublicKey = SERVER_PUBLIC_KEY
Endpoint = SERVER_IPV4:51820
AllowedIPs = 0.0.0.0/0
PersistentKeepalive = 25
- YOUR_CLIENT_PRIVATE_KEY → contents of privatekey
- SERVER_PUBLIC_KEY → contents of /etc/wireguard/publickey
- DNS — the DNS server to use.
- Important: set AllowedIPs to 0.0.0.0/0 to route all traffic.
mac.conf
In this file the only thing that changes is the “AllowedIPs” line, where we specify the IP of the wg0 interface.
# we're in ~/wireguard/clients/mac
nano mac.conf

# add the following:
[Interface]
PrivateKey = YOUR_CLIENT_PRIVATE_KEY
Address = 10.8.0.2/32
DNS = 9.9.9.9

[Peer]
PublicKey = SERVER_PUBLIC_KEY
Endpoint = SERVER_IPV4:51820
AllowedIPs = 10.8.0.1/32
PersistentKeepalive = 25
Add the Client to the WireGuard Server
nano /etc/wireguard/wg0.conf
And we add the client (peer), so the file looks like this:
[Interface]
Address = 10.8.0.1/24
DNS = 9.9.9.9
SaveConfig = true
PostUp = sysctl -w net.ipv4.ip_forward=1; iptables -t nat -A POSTROUTING -s 10.8.0.0/24 -o eth0 -j MASQUERADE; ufw route allow in on wg0 out on eth0
PostDown = sysctl -w net.ipv4.ip_forward=0; iptables -t nat -D POSTROUTING -s 10.8.0.0/24 -o eth0 -j MASQUERADE; ufw route delete allow in on wg0 out on eth0
ListenPort = 51820
PrivateKey = YOUR_SERVER_PRIVATE_KEY

[Peer]
PublicKey = CLIENT_PUBLIC_KEY #(~/wireguard/clients/mac/publickey)
AllowedIPs = 10.8.0.2/32
Save and apply changes with:
wg-quick down wg0 && wg-quick up wg0
Import the Profile on the Client
This can be done via QR code or with the mac-routing.conf file itself.
To download the mac-routing.conf file, the simplest way is to cat it and copy it to your local machine.
cat ~/wireguard/clients/mac/mac-routing.conf
Copy it and create a file in your favorite editor on your local machine. Name it whatever you want, but for consistency we’ll call it “mac-routing.conf” or “mac.conf”.
You can also do it in a slightly more sophisticated way with scp, which uses the SSH connection to copy files:
scp root@SERVER_IP:~/wireguard/clients/mac/mac.conf ~/Downloads/
Import the Profile (.conf File) into WireGuard
Download and install the app, which you can find here: https://www.wireguard.com/install/
Import the .conf file, activate the connection, and to test it you can run the following in the terminal.
Testing the Connection
Now let’s close the SSH connection we have open and try to connect through the VPN tunnel.
First, we can test if the VPN connection to the server is active:
ping 10.8.0.1
Just as before we used ssh root@server_ipv4, now we need to use the VPN connection we just configured and activated:
ssh root@10.8.0.1
And with this we’ve finished the configuration and have access to the server through the VPN tunnel.
We can test the other configuration, the one that routes all traffic — simply activating the profile in WireGuard will let us browse with the server’s IP. (You can check it here: ipinfo.io )
Problems Encountered Along the Way and Solutions
This is a compilation of errors and small issues I had during the installation process. Above I show you the corrected step-by-step, but when I originally did it, I ran into these problems.
Mixing up private/public keys in the configuration files.
I mixed up the server and client keys, and they were wrong in the configuration file… make sure the public and private keys are correct in the configuration files.
wg0 interface didn’t persist after reboot
After restarting the server, the WireGuard wg0 interface wouldn’t come up automatically.
To enable it by default so the system brings it up on boot:
sudo systemctl enable wg-quick@wg0
Potential issues: UFW vs iptables
When configuring traffic routing in a WireGuard VPN, it’s very common to find tutorials telling you to do something like this:
(which is what ChatGPT told me to do in the first place)
iptables -t nat -A POSTROUTING -s 10.8.0.0/24 -o eth0 -j MASQUERADE
This adds a rule so that packets leaving the VPN network (in this case 10.8.0.0/24) are “disguised” with the server’s IP (the eth0 interface), allowing them to reach the Internet correctly. This is a direct way of using iptables.
But if you have ufw (Uncomplicated Firewall) active, this may not work as expected.
Why?
Because when ufw is active, it manages its own iptables rules internally, and may ignore or even delete rules you added manually with iptables.
If, like me, you’re using UFW, you need to apply this to the configuration:
ufw route allow in on wg0 out on eth0
This tells ufw to allow forwarding traffic from the WireGuard interface (wg0) to the output interface (eth0).
Summary:
- If you don’t use ufw: you can use iptables rules directly.
- If you use ufw: don’t use iptables alone, handle routing with ufw route allow.